I’ve been collecting small domestic oddities for years — a chipped teacup inherited from an aunt, a bent teaspoon that survived a move, a child's drawing folded so many times it became a soft square. At some point these things stopped feeling like clutter and started feeling like a private archive. That archive became my mini-museum: a curated corner of home where ordinary objects are given attention, context and a little stage light. If you’ve ever wanted to turn the everyday into a small, intentional display, here’s how I do it — practically, playfully, and with an eye for the stories that make objects matter.
Why create a mini-museum at home?
People ask me: why bother? The short answer is that organizing objects into a small exhibition changes the way you see them. A mug becomes a relic of a morning, a ticket stub becomes a map of a season. It’s not about hoarding or showing off — it’s about noticing. Curating a mini-museum helps sharpen attention, preserve memory and create a gentle ritual of reflection. It’s also a way to make your home more distinctly yours.
Start with a theme (but stay flexible)
I always begin with a loose theme. Themes are helpful because they give you permission to say “no” to otherwise lovely objects that don’t fit. Some themes I’ve used:
Your theme can be narrow or broad. My current shelf is labelled “Kitchen Lives”: utensils, small containers, and objects stained by use. Keep the frame loose. Often a surprising item will arrive and change the story you thought you were telling.
Choose a display space with intention
Not every wall or shelf is museum-ready. I look for places that people pass by slowly — a hallway ledge, a mantel, a bookshelf at eye level. Lighting is important; natural light can be kind, but avoid direct afternoon sun on paper. A small clip-on spotlight or a focused LED lamp can do wonders. I use a cordless puck light for nighttime moods — cheap, adjustable and unobtrusive.
Think in vignettes
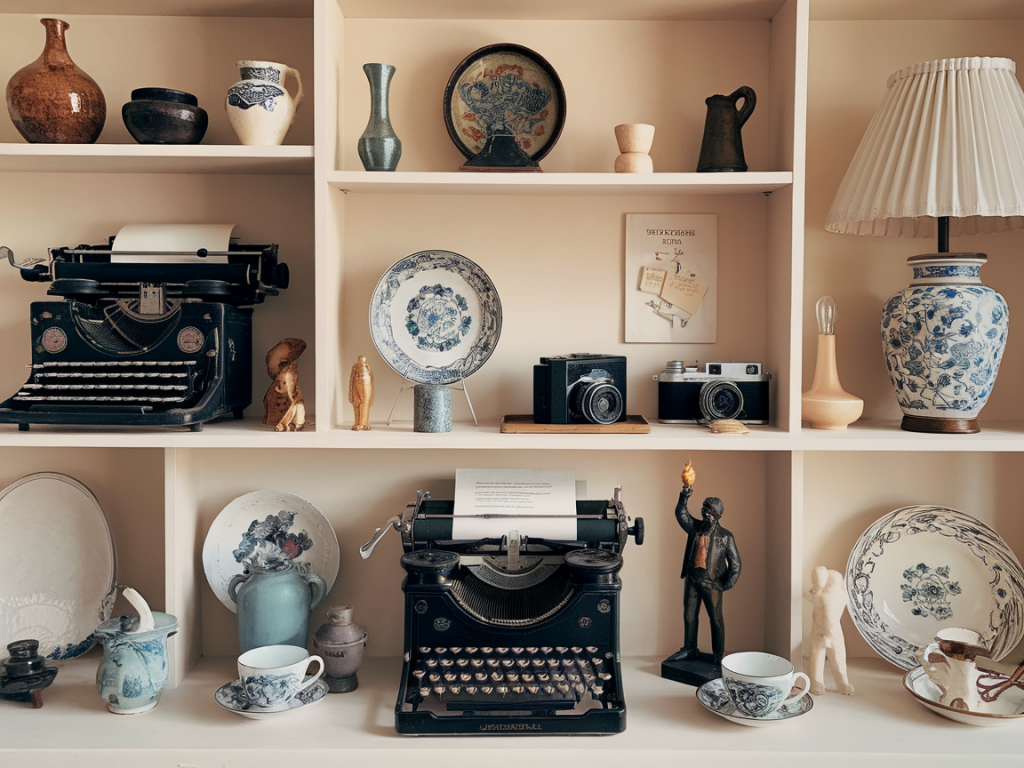
Rather than spreading objects evenly, I arrange them into small groups or vignettes. A vignette usually has:
For example, a bent teaspoon sits on a folded piece of vintage recipe paper, a tiny jar of preserved lemon rind sits beside it, and a postcard propped behind gives a sense of place. The eye needs a place to land, a story to start with.
Labeling: words matter
I love handwritten labels. They make the display feel warm and human. Labels can be as simple as a scrap of kraft paper with a sentence: “Aunt May’s spoon, 1987 — used daily.” If you want to push further, include a line about why you kept it: “Kept because it clinked in the kitchen when she laughed.” Labels don’t need to be exhaustive; a phrase or a date often does the job better than an essay.
Play with height and texture
Varied heights make a small display feel dynamic. I use books, wooden blocks, and stacked coasters to create levels. Textures—linen napkins, rusty metal, glossy ceramic—create a sensory dialogue. Try grouping objects by contrast: a smooth glass bottle beside a rough stone; a soft textile next to a hard metal pin. Variation makes the eye move and keeps the vignette alive.
Preservation basics
People often worry about damaging objects. Here are some studio-level basics I follow:
None of this requires archival training. Small steps — like keeping paper labels off the adhesive side — protect treasures without fuss.
Answering common practical questions
“How many items should I display?” I tend to favor restraint. Five to fifteen objects per vignette prevents visual clutter. “What if I live in a small flat?” Use vertical space — a pegboard, a shallow shelf or a series of floating cubes. “Can I mix expensive and humble items?” Absolutely. A chipped plate next to a sleeker modern object can highlight both. The point is narrative, not monetary value.
Use containers and cases strategically
Glass cloches, shallow trays, and shadow boxes instantly make things feel curated. I found a small glass dome at a charity shop that turned a single pebble into a specimen. Clear acrylic boxes are discreet and protect delicate items. For documents, a simple frame with UV-filtering glass keeps them visible and safe.
Invite interaction
A museum at home should feel alive, not locked behind glass. I leave a couple of objects accessible — a stack of recipe cards people can riffle through, a notebook where guests can add a memory. Sometimes I host a tiny “opening” where I explain the pieces. Conversation is part of the exhibit.
Rotate, revise, and live with it
Curating is ongoing. I rotate pieces seasonally, retire items when their narrative feels exhausted, and welcome new arrivals. The act of revising helps maintain curiosity — and keeps the display from becoming merely decorative. If you want prompts, try a monthly theme: “tools,” “gifts,” “worn edges.”
Share the practice
If you’re tempted to show others, photograph your vignettes and post them with a short note about why the objects matter. I occasionally share layouts on my site at W Oswald Co as invitations to notice the small things. The responses I get — people sending photos of their own humble displays — are part of the joy.
Curating a personal mini-museum is less about authority and more about attention. It’s a way to slow down and rehear the ordinary in a slightly different key. You don’t need a label from a gallery or a certificate of authenticity. All you need is a few well-chosen objects, a little patience, and the willingness to let small things tell their stories.